Obsidian Vault MCP Server MCP Server
io.github.OleksandrKucherenko/mcp-obsidian-via-rest
Access and search your Obsidian vault via AI with REST API integration and semantic search.
What is the Obsidian Vault MCP Server MCP server?
The Obsidian Vault MCP Server enables AI assistants to read, search, and interact with Obsidian notes through a local REST API. It provides tools for retrieving note content, full-text search, and semantic search across your vault, allowing Claude and other AI agents to access your knowledge base directly.
This MCP server bridges Obsidian and AI assistants by exposing your vault through standardized tools. You can search notes, retrieve content, and let AI agents summarize findings or generate reports from your personal knowledge base. It supports multiple deployment options including Docker, npm, and various transport mechanisms (stdio and HTTP) with automatic failover and health monitoring.
How to install Obsidian Vault MCP Server
Copy-paste configuration for popular MCP clients.
API_KEYrequiredsecretObsidian Local REST API key
API_URLSrequiredJSON array or semicolon-separated list of Obsidian REST API URLs for failover
API_HOSTObsidian REST API host (legacy single-URL config)
API_PORTObsidian REST API port (legacy single-URL config)
MCP_TRANSPORTSEnabled transports (default: stdio,http)
MCP_HTTP_PORTHTTP transport bind port (default: 3000)
MCP_HTTP_HOSTHTTP transport bind host (default: 0.0.0.0)
MCP_HTTP_TOKENsecretBearer token for HTTP transport authentication
Tools & capabilities
Tools this server exposes to the agent.
get_note_content— Retrieve content and metadata of an Obsidian note by file pathobsidian_search— Search notes using a query string for full-text matchingobsidian_semantic_search— Perform semantic search across notes to find conceptually related content
Use cases
- Search your Obsidian vault for specific topics and have AI summarize findings into a report
- Find all notes related to a concept (e.g., monitoring tools, logging frameworks) and generate comparison tables
- Retrieve note content programmatically to feed into AI analysis or document generation workflows
- Use semantic search to discover related notes even when exact keywords don't match
- Integrate your personal knowledge base with Claude, Gemini, or other AI CLI tools for context-aware assistance
Obsidian Vault MCP Server MCP server FAQ
It's an MCP server that connects your Obsidian vault to AI assistants via a local REST API, exposing tools for searching and retrieving notes so Claude and other agents can access your knowledge base.
Yes, the server is open-source (MIT license) and available on npm and Docker Hub at no cost.
Install via npm with `bunx -y @oleksandrkucherenko/mcp-obsidian` or use Docker with `ghcr.io/oleksandrkucherenko/obsidian-mcp:latest`. Configure it in your MCP settings JSON with your Obsidian API key and vault URL.
You need an Obsidian REST API key (generated in Obsidian settings) and the URL(s) where your Obsidian REST API is running (typically https://127.0.0.1:27124 or similar).
Yes, the server supports multi-URL configuration with automatic failover and health monitoring, allowing it to test and select the fastest URL among multiple Obsidian API endpoints.
The server supports stdio transport (default, best for local clients) and HTTP transport with optional authentication headers for remote access.
README (reference)
Source of truth, from the repository.
mcp-obsidian
Deployed / Usage







CI/CD Status


<!-- TOC -->
- mcp-obsidian
MCP Tools & Resources
This MCP server exposes the following tools and resources to AI assistants:
Tools
| Tool | Description | Parameters |
|---|---|---|
get_note_content | Retrieve content and metadata of an Obsidian note | filePath (string) - Path to the note |
obsidian_search | Search notes using a query string | query (string) - Search query |
obsidian_semantic_search | Semantic search for notes | query (string) - Search query |
Resources
| Resource | URI Pattern | Description |
|---|---|---|
| Obsidian Note | obsidian://{path} | Access notes via URI (e.g., obsidian://Daily/2025-01-16.md) |
Quick Test
# 1. Set your Obsidian API key
export OBSIDIAN_API_KEY="your-obsidian-rest-api-key"

# 2. Add MCP server and test (Claude Code)
claude mcp add obsidian -- bunx -y @oleksandrkucherenko/mcp-obsidian
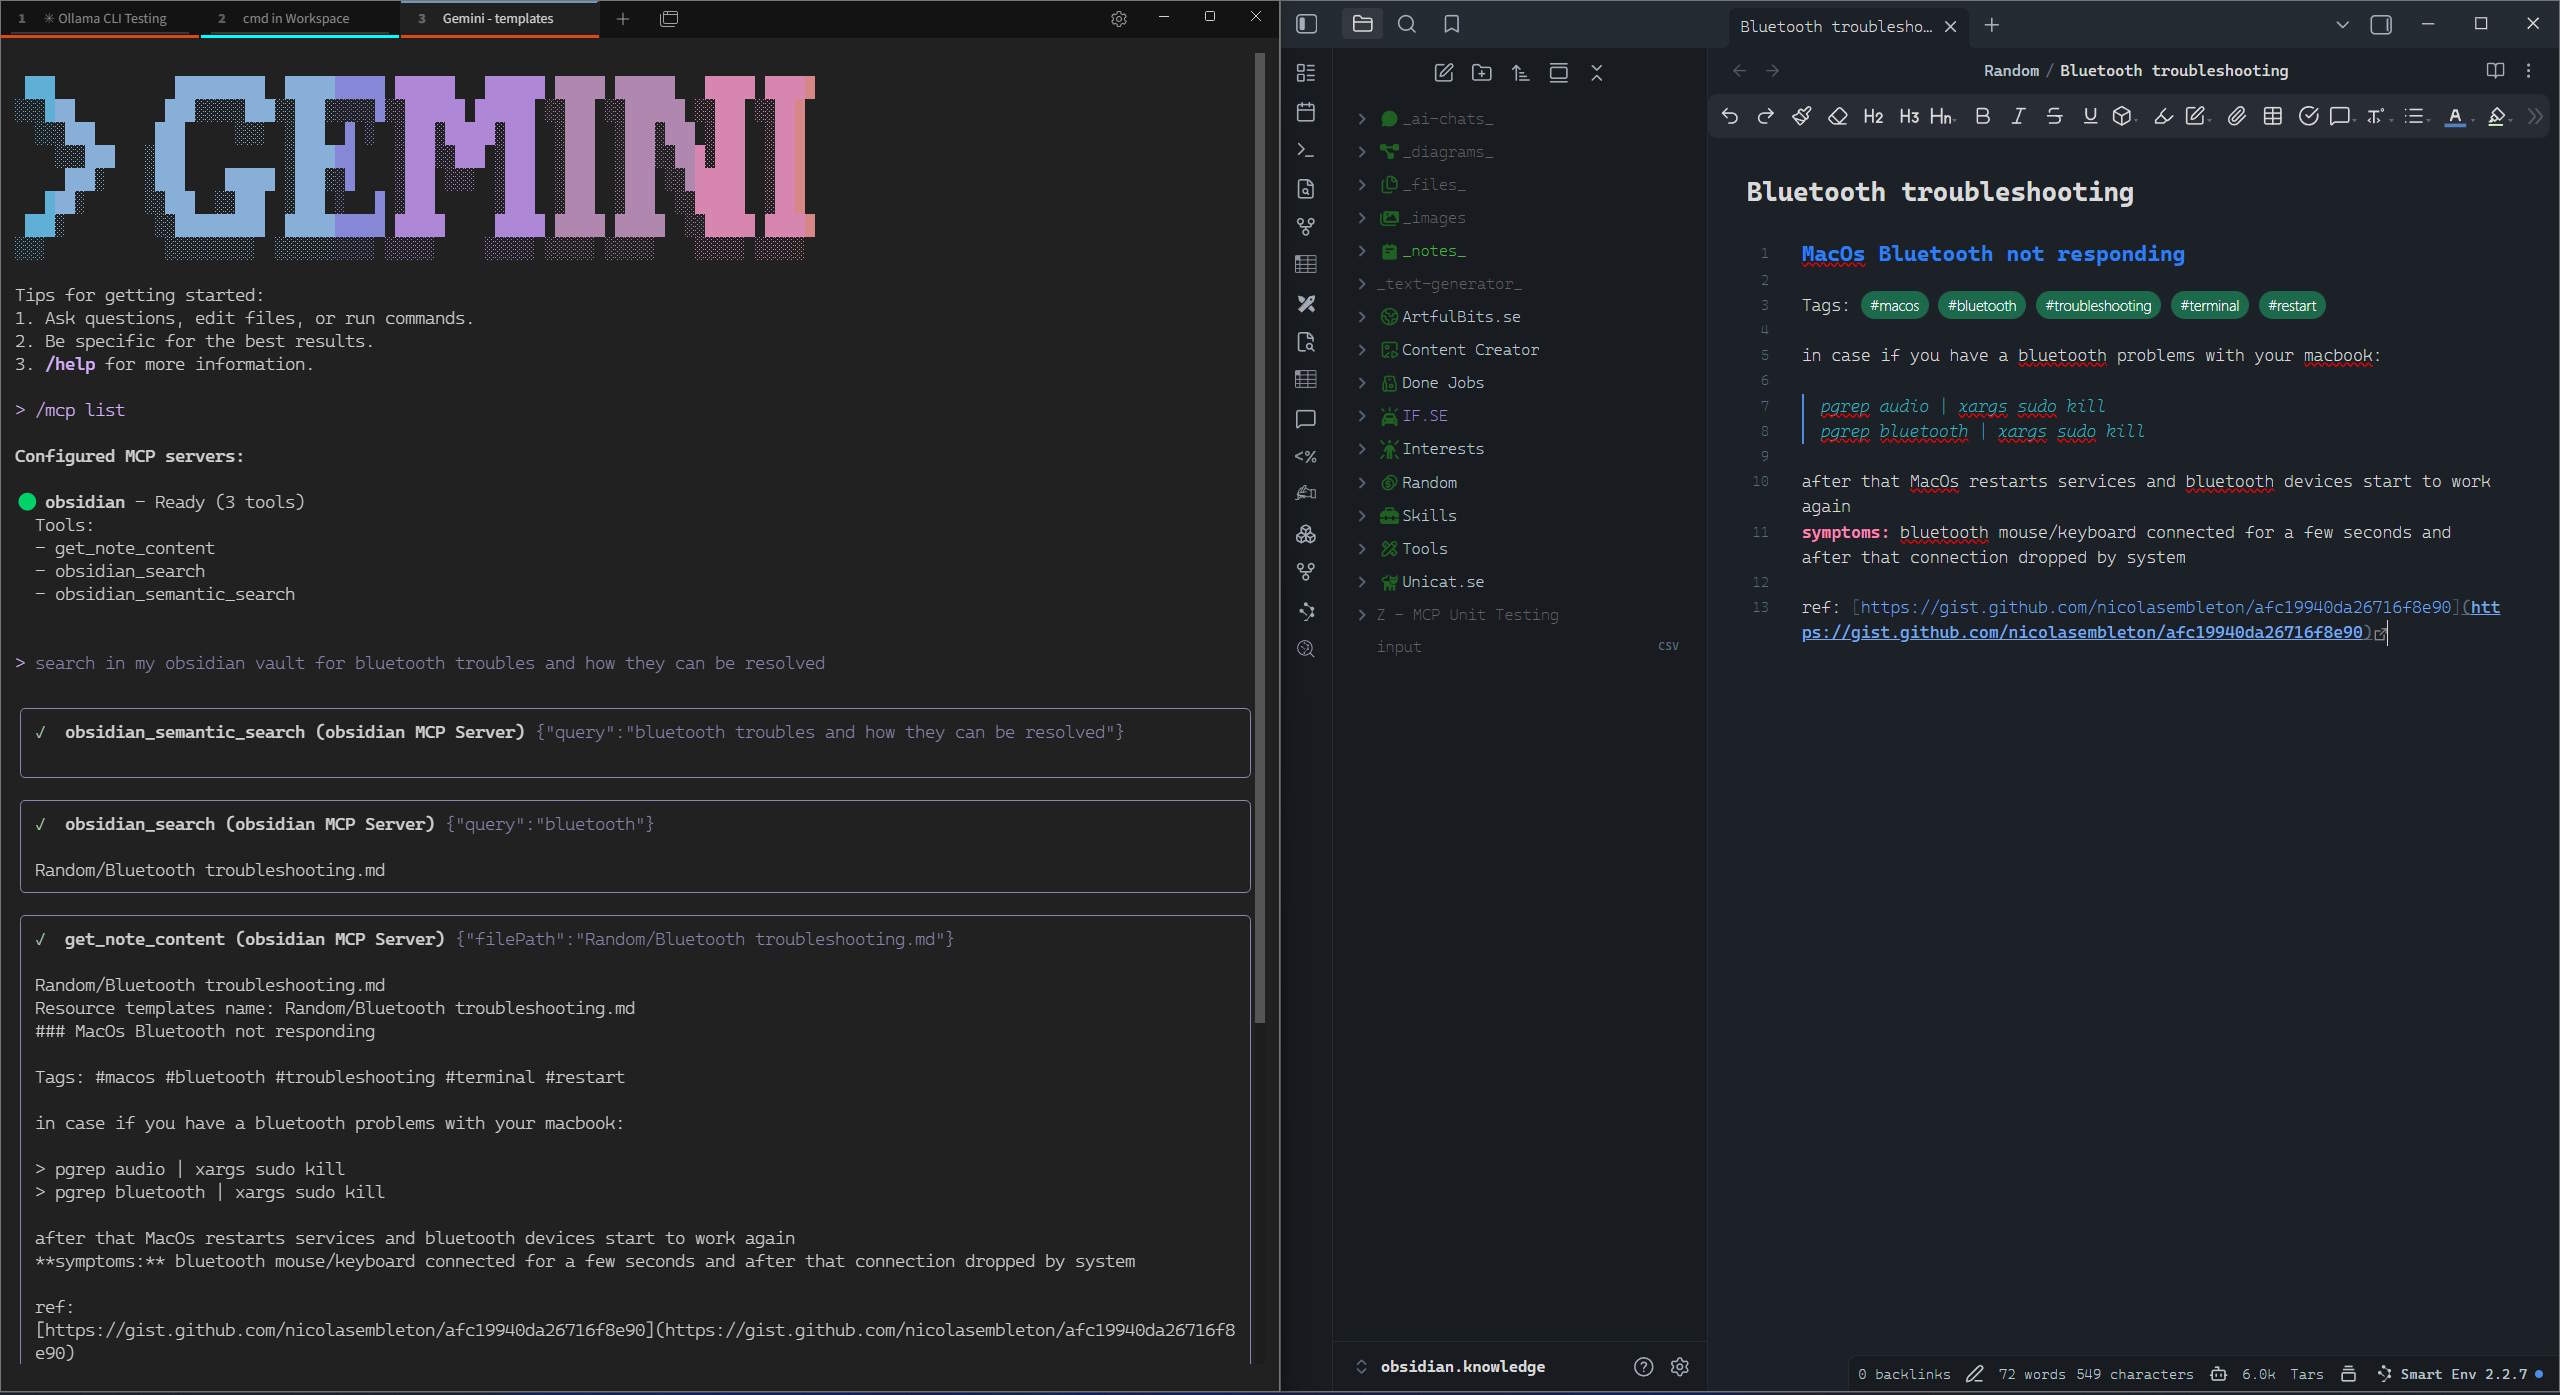
claude "Search my Obsidian vault for monitoring tools, summarize findings"

# 2. Alternative: Codex CLI
codex mcp add obsidian --command "bunx -y @oleksandrkucherenko/mcp-obsidian"
codex "Find notes about logging frameworks and create a comparison table"
Example use-case: "Find all tools in my Obsidian vault for tracking logs and metrics, make a summary report" — the AI searches your vault, finds notes about OpenTelemetry, Datadog, Prometheus, etc., and generates a structured summary.
For other CLI tools (Gemini, OpenCode, Kilo Code, Copilot), see Manual Testing Guide.
Configure MCP
Multi-URL Configuration (Recommended)
Use API_URLS for automatic failover and self-healing. The server tests all URLs in parallel, selects the fastest one, and automatically reconnects on failure.
{
  "mcpServers": {
    "obsidian": {
      "command": "docker",
      "args": [
        "run",
        "--name", "mcp-obsidian",
        "--rm",
        "-i",  // Keep STDIN open for stdio transport
        "-p", "3000:3000",
        "-e", "API_KEY",
        "-e", "API_URLS",
        "-e", "DEBUG", // for logs
        "ghcr.io/oleksandrkucherenko/obsidian-mcp:latest"
      ],
      "env": {
        "API_KEY": "<secret_key>",
        // JSON array - automatically tests and selects fastest URL
        "API_URLS": "[\"https://127.0.0.1:27124\",\"https://172.26.32.1:27124\",\"https://host.docker.internal:27124\"]",
        "DEBUG": "mcp:*"
      }
    }
  }
}
Self-Healing Features:
- ✅ Parallel URL testing on startup
- ✅ Automatic selection of fastest URL
- ✅ Health monitoring every 30 seconds
- ✅ Automatic failover on connection loss
- ✅ Exponential backoff to prevent thrashing
Available transports:
stdio- Standard input/output (default, best for local MCP clients)http- HTTP JSON-RPC with SSE streaming (best for remote access)
WSL2 Example:
# Automatically determine WSL gateway IP
export WSL_GATEWAY_IP=$(ip route show | grep -i default | awk '{ print $3}')

# Configure with multiple fallback URLs
API_URLS='["https://127.0.0.1:27124", "https://'$WSL_GATEWAY_IP':27124", "https://host.docker.internal:27124"]'
HTTP Transport Configuration
The MCP server supports HTTP transport for remote access with automatic URL failover:
{
  "mcpServers": {
    "obsidian-http": {
      "command": "docker",
      "args": [
        "run",
        "--name", "mcp-obsidian-http",
        "--rm",
        "-p", "3000:3000",
        "-e", "API_KEY",
        "-e", "API_URLS",
        "-e", "MCP_HTTP_PATH",
        "ghcr.io/oleksandrkucherenko/obsidian-mcp:latest"
      ],
      "env": {
        "API_KEY": "<secret_key>",
        "API_URLS": "[\"https://127.0.0.1:27124\",\"https://172.26.32.1:27124\",\"https://host.docker.internal:27124\"]",
        "MCP_HTTP_PATH": "/mcp" // endpoint path (default is: /mcp)
      }
    }
  }
}
Decoupled Configuration with Authentication
# Automatically determine WSL gateway IP
export WSL_GATEWAY_IP=$(ip route show | grep -i default | awk '{ print $3}')

# Configure with multiple fallback URLs
API_URLS='["https://127.0.0.1:27124", "https://'$WSL_GATEWAY_IP':27124", "https://host.docker.internal:27124"]'

# run MCP server on docker separately from IDE
docker run --name mcp-obsidian-http --rm \
  -p 3000:3000 \
  -e API_KEY="<secret_key>" \
  -e API_URLS="${API_URLS}" \
  -e MCP_HTTP_TOKEN=<your-secret-token-here> \
  ghcr.io/oleksandrkucherenko/obsidian-mcp:latest
{
  "mcpServers": {
    "obsidian": {
      "type": "streamable-http",
      "url": "http://localhost:3000/mcp",
      "headers": {
        "Authorization": "Bearer <your-secret-token-here>"
      }
    }
  }
}
Clients must include the Authorization header:
Authorization: Bearer your-secret-token-here
Stdio Transport Configuration
For local development with stdio transport (default):
{
  "mcpServers": {
    "obsidian": {
      "command": "docker",
      "args": [
        "run",
        "--name", "mcp-obsidian-windsurf",
        "--interactive",
        "--rm",
        "-e", "API_KEY",
        "-e", "API_URLS",
        "-e", "DEBUG",
        "ghcr.io/oleksandrkucherenko/obsidian-mcp:latest"
      ],
      "env": {
        "API_KEY": "<secret_key>",
        "API_URLS": "[\"https://127.0.0.1:27124\",\"https://172.26.32.1:27124\"]",
        "DEBUG": "mcp:*" // default: disabled logs
      }
    }
  }
}
-
--rm- Automatically remove the container and its associated anonymous volumes when it exits -
-i, --interactive- Keep STDIN open -
-e, --env- Set environment variables -
--name string- Assign a name to the container -
-p, --publish- Publish container port to host
Legacy Single-URL Configuration
For backward compatibility, you can still use single-URL configuration with API_HOST and API_PORT:
{
  "mcpServers": {
    "obsidian": {
      "command": "docker",
      "args": [
        "run",
        "--name", "mcp-obsidian",
        "--rm",
        "-i",
        "-e", "API_KEY",
        "-e", "API_HOST",
        "-e", "API_PORT",
        "ghcr.io/oleksandrkucherenko/obsidian-mcp:latest"
      ],
      "env": {
        "API_KEY": "<secret_key>",
        "API_HOST": "https://172.26.32.1",  // single URL without failover
        "API_PORT": "27124"
      }
    }
  }
}
Note: Single-URL configuration does not provide automatic failover or health monitoring. Use API_URLS for production deployments.
Health Endpoint
When HTTP transport is enabled, the server exposes a health check endpoint at /health:
curl http://localhost:3000/health
Response:
{
  "status": "healthy",
  "timestamp": "2025-01-12T12:00:00.000Z",
  "transport": "http",
  "authEnabled": false
}
For comprehensive health status including Obsidian API connection and all transports, you can use the getHealthStatus() function which returns:
{
  "healthy": true,
  "obsidian": {
    "connected": true,
    "url": "https://obsidian:27124",
    "lastCheck": 1705065600000
  },
  "transports": {
    "stdio": { "running": true, "enabled": true },
    "http": { "running": true, "enabled": true }
  },
  "uptime": 3600,
  "timestamp": 1705065600000
}
CLI Tools Configuration
This section shows how to configure popular AI CLI tools to use the MCP Obsidian server.
# MacOs or Linux
curl -fsSL https://bun.sh/install | bash

# Windows
powershell -c "irm bun.sh/install.ps1 | iex"
Claude Code CLI
Docker:
# Create mcp.json configuration
cat > mcp.json << 'EOF'
{
  "mcpServers": {
    "obsidian": {
      "command": "docker",
      "args": ["run", "--rm", "-i", "-e", "API_KEY", "-e", "API_URLS", "ghcr.io/oleksandrkucherenko/obsidian-mcp:latest"],
      "env": {
        "API_KEY": "<your-obsidian-api-key>",
        "API_URLS": "[\"https://host.docker.internal:27124\"]"
      }
    }
  }
}
EOF

# Run Claude with MCP config
claude --mcp-config ./mcp.json
NPX/Bunx:
cat > mcp.json << 'EOF'
{
  "mcpServers": {
    "obsidian": {
      "command": "bunx",
      "args": ["-y", "@oleksandrkucherenko/mcp-obsidian"],
      "env": {
        "API_KEY": "<your-obsidian-api-key>",
        "API_URLS": "[\"https://127.0.0.1:27124\"]"
      }
    }
  }
}
EOF

claude --mcp-config ./mcp.json
Gemini CLI
Docker:
gemini mcp add \
  -e API_KEY=<your-obsidian-api-key> \
  -e API_URLS='["https://host.docker.internal:27124"]' \
  obsidian \
  docker run --rm -i ghcr.io/oleksandrkucherenko/obsidian-mcp:latest
NPX/Bunx:
gemini mcp add \
  -e API_KEY=<your-obsidian-api-key> \
  -e API_URLS='["https://127.0.0.1:27124"]' \
  obsidian \
  bunx -y @oleksandrkucherenko/mcp-obsidian
HTTP Transport (remote server):
gemini mcp add --transport http obsidian-http http://localhost:3000/mcp
List and manage servers:
gemini mcp list
gemini mcp remove obsidian
OpenCode CLI
Create opencode.json in your project root:
Docker:
{
  "mcp": {
    "obsidian": {
      "type": "local",
      "command": ["docker", "run", "--rm", "-i",
        "-e", "API_KEY", "-e", "API_URLS",
        "ghcr.io/oleksandrkucherenko/obsidian-mcp:latest"],
      "environment": {
        "API_KEY": "{env:API_KEY}",
        "API_URLS": "[\"https://host.docker.internal:27124\"]"
      },
      "enabled": true
    }
  }
}
NPX/Bunx:
{
  "mcp": {
    "obsidian": {
      "type": "local",
      "command": ["bunx", "-y", "@oleksandrkucherenko/mcp-obsidian"],
      "environment": {
        "API_KEY": "{env:API_KEY}",
        "API_URLS": "[\"https://127.0.0.1:27124\"]"
      },
      "enabled": true
    }
  }
}
HTTP Transport:
{
  "mcp": {
    "obsidian-http": {
      "type": "remote",
      "url": "http://localhost:3000/mcp",
      "enabled": true
    }
  }
}
Kilo Code CLI
Create .kilocode/mcp.json in your project or ~/.kilocode/cli/global/settings/mcp_settings.json globally:
Docker:
{
  "mcpServers": {
    "obsidian": {
      "command": "docker",
      "args": ["run", "--rm", "-i", "-e", "API_KEY", "-e", "API_URLS",
        "ghcr.io/oleksandrkucherenko/obsidian-mcp:latest"],
      "env": {
        "API_KEY": "<your-obsidian-api-key>",
        "API_URLS": "[\"https://host.docker.internal:27124\"]"
      }
    }
  }
}
NPX/Bunx:
{
  "mcpServers": {
    "obsidian": {
      "command": "bunx",
      "args": ["-y", "@oleksandrkucherenko/mcp-obsidian"],
      "env": {
        "API_KEY": "<your-obsidian-api-key>",
        "API_URLS": "[\"https://127.0.0.1:27124\"]"
      }
    }
  }
}
HTTP Transport:
{
  "mcpServers": {
    "obsidian-http": {
      "type": "streamable-http",
      "url": "http://localhost:3000/mcp",
      "headers": {
        "Authorization": "Bearer <your-token>"
      }
    }
  }
}
Codex CLI
Docker:
# Register MCP server
codex mcp add obsidian \
  --command "docker run --rm -i -e API_KEY -e API_URLS ghcr.io/oleksandrkucherenko/obsidian-mcp:latest" \
  --env API_KEY=<your-obsidian-api-key> \
  --env 'API_URLS=["https://host.docker.internal:27124"]'
NPX/Bunx:
codex mcp add obsidian \
  --command "bunx -y @oleksandrkucherenko/mcp-obsidian" \
  --env API_KEY=<your-obsidian-api-key> \
  --env 'API_URLS=["https://127.0.0.1:27124"]'
GitHub Copilot CLI
Create ~/.copilot/mcp-config.json (or .copilot/mcp-config.json in repo root):
Docker:
{
  "mcpServers": {
    "obsidian": {
      "type": "local",
      "command": "docker",
      "args": ["run", "--rm", "-i", "-e", "API_KEY", "-e", "API_URLS",
        "ghcr.io/oleksandrkucherenko/obsidian-mcp:latest"],
      "env": {
        "API_KEY": "${OBSIDIAN_API_KEY}",
        "API_URLS": "[\"https://host.docker.internal:27124\"]"
      },
      "tools": ["*"]
    }
  }
}
NPX/Bunx:
{
  "mcpServers": {
    "obsidian": {
      "type": "local",
      "command": "bunx",
      "args": ["-y", "@oleksandrkucherenko/mcp-obsidian"],
      "env": {
        "API_KEY": "${OBSIDIAN_API_KEY}",
        "API_URLS": "[\"https://127.0.0.1:27124\"]"
      },
      "tools": ["*"]
    }
  }
}
Note: Copilot CLI v0.0.340+ requires ${VAR} syntax for environment variable expansion. Set OBSIDIAN_API_KEY in your shell before running.
Quick Reference
| CLI Tool | Config File | Docker Support | HTTP Transport |
|---|---|---|---|
| Claude Code | mcp.json | ✅ | ✅ |
| Gemini | settings.json | ✅ | ✅ |
| OpenCode | opencode.json | ✅ | ✅ |
| Kilo Code | .kilocode/mcp.json | ✅ | ✅ |
| Codex | CLI commands | ✅ | ✅ |
| Copilot | ~/.copilot/mcp-config.json | ✅ | ✅ |
For detailed testing and verification, see Manual Testing Guide.
Setup and Troubleshooting
Setup
- Run Obsidian Desktop Application and enable Local REST API in Settings.
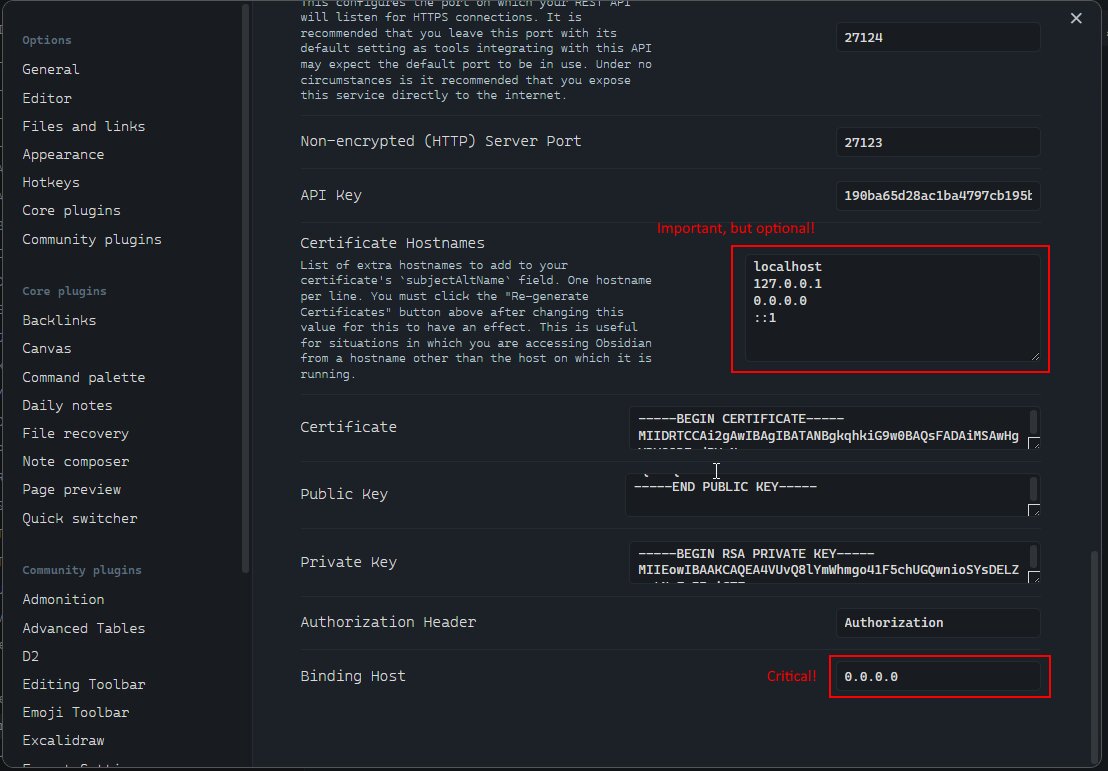
This setting will allow you to connect to the Local REST API from any network interface (not only localhost, which is critical for WSL2 setup).
-
Copy the API Key from Obsidian Settings; you will need it for the MCP configuration.
-
Verify that the Obsidian Local REST API is running and accessible from your machine.
-
Next Step is always to verify the network setup on your machine (firewall rules, etc).
Verify that the Obsidian REST API is running (Windows Host, MacOS, Linux)
Run in Windows CMD terminal:
# windows CMD, verify that port is listening (that rest api is running)
netstat -an | findstr 27124
# Expected output:
#   TCP    0.0.0.0:27124           0.0.0.0:0               LISTENING

# Verify that Obsidian Local REST API is working
curl --insecure https://localhost:27124
wget --no-check-certificate -S https://localhost:27124
http --verify=no https://localhost:27124
Expected REST API response:
{
  "status": "OK",
  "manifest": {
    "id": "obsidian-local-rest-api",
    "name": "Local REST API",
    "version": "3.2.0",
    "minAppVersion": "0.12.0",
    "description": "Get, change or otherwise interact with your notes in Obsidian via a REST API.",
    "author": "Adam Coddington",
    "authorUrl": "https://coddingtonbear.net/",
    "isDesktopOnly": true,
    "dir": ".obsidian/plugins/obsidian-local-rest-api"
  },
  "versions": {
    "obsidian": "1.8.10",
    "self": "3.2.0"
  },
  "service": "Obsidian Local REST API",
  "authenticated": false
}
WSL2, Docker hosted on Ubuntu
graph LR
    subgraph "Windows Machine"
      obs("Obsidian Application")

      subgraph "WSL2"
        subgraph "Ubuntu"
          subgraph "Docker"
            mcp("mcp-obsidian:latest")
          end
        end
      end

      firewall(["Windows Firewall"]) -->|27124| obs

      mcp -->|https://$WSL_GATEWAY_IP:27124| firewall

      IDE -.->|MCP Server Tools| mcp
    end
Run inside the WSL2 Ubuntu Terminal:
export WSL_GATEWAY_IP=$(ip route show | grep -i default | awk '{ print $3}')
echo $WSL_GATEWAY_IP # expected something like: 172.26.32.1

# Verify that Obsidian Local REST API is working
curl --insecure https://$WSL_GATEWAY_IP:27124
wget --no-check-certificate -S https://$WSL_GATEWAY_IP:27124
http --verify=no https://$WSL_GATEWAY_IP:27124
Verify Windows Firewall
Run GUI and Setup Manual The Rules:
# Windows Defender Firewall / Inbound Rules. Press Win+R and type WF.msc or firewall.cpl
WF.msc
firewall.cpl # and then press 'Advanced settings'
Or Run in Windows PowerShell as Administrator:
# Add firewall rule to allow port 27124 (Run in Admin PowerShell)
New-NetFirewallRule -DisplayName "WSL2 Obsidian REST API" -Direction Inbound -LocalPort 27123,27124 -Protocol TCP -Action Allow
Or Run in Windows CMD terminal:
# check firewall rules (CMD) that manage 27124 port
netsh advfirewall firewall show rule name=all | findstr /C:"Rule Name" /C:"LocalPort" /C:"RemotePort" | findstr /C:"27124"

# display rules that has WSL2 keyword in own name
netsh advfirewall firewall show rule name=all | grep -A 13 WSL2

# display rule definition by port number (4 line after, 9 lines before)
netsh advfirewall firewall show rule name=all | grep -A 4 -B 9 27124
Disable/Enable Firewall
Execute in Windows PowerShell as Administrator:
# Temporarily turn off firewall (for testing ONLY, not recommended for regular use)
Set-NetFirewallProfile -Profile Domain,Public,Private -Enabled False

# Restore Firewall state
Set-NetFirewallProfile -Profile Domain,Public,Private -Enabled True
Verify Connectivity on BusyBox Container
These steps allow us to confirm that the network setup is correct and the container can connect to the Local REST API.
Execute inside the WSL2 Ubuntu terminal:
export WSL_GATEWAY_IP=$(ip route | grep default | awk '{print $3}')
echo "Windows host IP from WSL2: $WSL_GATEWAY_IP"
# Output:
#   Windows host IP from WSL2: 172.26.32.1

# run docker container to verify the connectivity from Docker inside
docker run --rm -it --network=host busybox sh

# inside the container run:
which wget
# /bin/wget

export WINDOWS_HOST_IP="172.26.32.1"
echo $WINDOWS_HOST_IP
# 172.26.32.1

# try to connect to the Local REST API
wget -qO- --no-check-certificate "https://$WINDOWS_HOST_IP:27124"
wget -qO- --no-check-certificate https://172.26.32.1:27124
Dockerized Obsidian
Related MCP servers

io.github.OliverGrabner/composer
Give your AI coding agent an architecture canvas to design and evolve diagrams.

French real-estate intelligence from official open data: DVF, valuations, rents, tax, DPE, risks.

Security gateway for AI agents: policy, approval, and audited execution, no secrets shared.
View repository →
nanomem
Memory that knows when a remembered fact has been replaced, not just when it was written.

Pay-per-call web & EU business intelligence for AI agents (x402 USDC on Base). 11 tools.
View repository →
Discover GovOmniAI machine services and the live autonomous MPP payment path.
View repository →